Installing Shocks and Sways
This material is based on Bob Cohen's Shock Absorber and Spring Replacement and Robert Holland's Miata Shock Replacement articles.
What you'll need
|
Torque values
|
Don't underestimate the value of having the right tools. We had at
least 2 of all the sockets and wrenches on hand. We also used an impact
wrench to remove a lot of the fasteners. The total time, with 2 people
for front & rear shocks and front & rear sway bars was 7 hours, including
a break for lunch and refreshments. This was the first time either of us
had performed this on a Miata.
Step 1 - Preparation
Jack the car up and put it on jack stands. We put the whole car up on jack stands but you could do the front and back independently. MAKE SURE THE CAR IS SECURE!. Having a car fall on you is no fun. Once the car is lifted, remove all 4 wheels.
Step 2 - The Rear Shocks
The rear shocks are easier than the fronts. Starting with these will give you a good idea of what to expect without being too difficult. The total time was about 2 hours to replace both shocks and the rear sway bar (the sway bar took about 5 minutes).
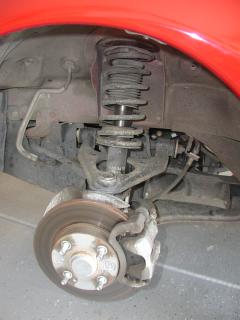
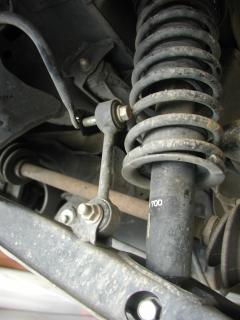
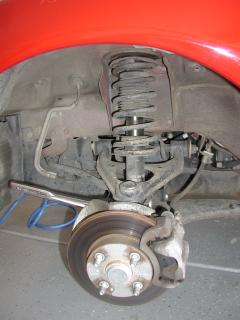
This is what the rear looks like with the old shock. Notice how the
original boot is not quite all there. The rubber was very brittle.
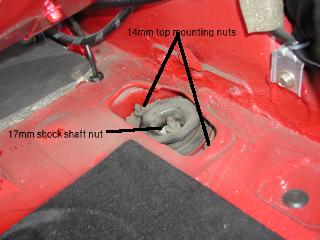 2.1 - Remove the metal trunk guard that protects the fuel lines and
the spare tire so that you can access the top shock mounts.
2.1 - Remove the metal trunk guard that protects the fuel lines and
the spare tire so that you can access the top shock mounts.
2.2 - Loosen the 17mm shock absorber upper shaft nut a few turns. CAUTION: Don't remove the nut, this would allow the spring to separate from the shock.
2.3 - Remove the 2 14mm upper mounting plate nuts.
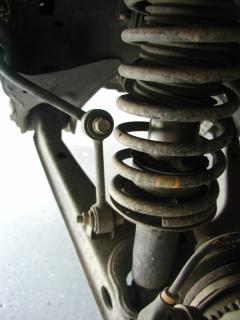 2.4 - Disconnect the sway bar's attachment to the lower A-arm linkage.
This is a 14mm bolt and nut (this is one of the places having both a
wrench and socket comes in handy). You could disconnect the link from
the A-arm but the sway bar to link is suppose to be easier to re-attach,
and this needed to be removed anyway for the sway bar replacement.
2.4 - Disconnect the sway bar's attachment to the lower A-arm linkage.
This is a 14mm bolt and nut (this is one of the places having both a
wrench and socket comes in handy). You could disconnect the link from
the A-arm but the sway bar to link is suppose to be easier to re-attach,
and this needed to be removed anyway for the sway bar replacement.
I had a box end wrench on the bolt head to hold it in place while
loosening the nut. When the pressure is relieved the end-link snapped
back, pinching the wrench against the spring.
 2.5 - Remove the 17mm lower shock mounting bolt.
2.6 - Now would probably be a good time to mark the spring orientation. You'll want the springs to go back in the way they came out.
2.7 - Step on the hub to lower it and pull the shock and spring out. Two people make this easier.
2.8 - See the white nylon gasket at the top of the shock mount? Don't forget to put it back there before you replace the shocks.
2.9 - Using the spring compressor, compress the spring until the tension is off the top spring seat. You can now remove the 17mm nut from the top of the shock shaft. Be very careful compressing the springs. They have have a lot of force when compressed and can cause considerable damage to property and persons if they accidentally come loose. Slide the shock out.
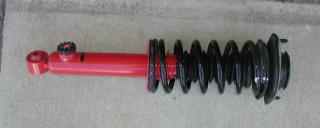
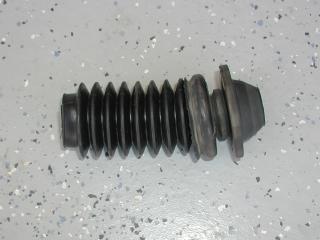 2.10 - A note about shock boots. We replaced the stock shocks with
KYB AGX and used KYB shock boots. The original boots were very brittle
and broken into may sections. To use the KYB boots, we cut off the
bump stop down to the first bellow. The original bump stops were already
separated from the bellows. We glued the original bump stop to the new
boot.
2.10 - A note about shock boots. We replaced the stock shocks with
KYB AGX and used KYB shock boots. The original boots were very brittle
and broken into may sections. To use the KYB boots, we cut off the
bump stop down to the first bellow. The original bump stops were already
separated from the bellows. We glued the original bump stop to the new
boot.
 2.11 - Slide the new shock inside the still compressed spring. Put the
new boot on and re-attach the top spring seat/mounting plate with the
17mm nut. Snug up the nut.
2.11 - Slide the new shock inside the still compressed spring. Put the
new boot on and re-attach the top spring seat/mounting plate with the
17mm nut. Snug up the nut.
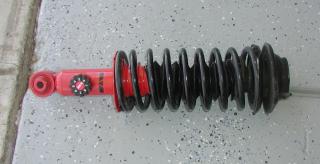
2.12 - Uncompress the spring CAREFULLY. Now you're ready to put it back on the car.
That really is the same stock spring. I cleaned it up a little with a
rag and it still looks pretty good!
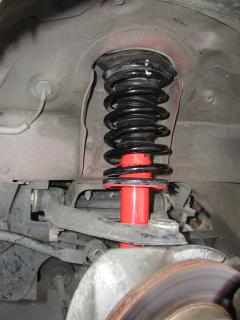
 2.13 - Step down on the hub and put the shock and spring in place.
You did remember the white nylon gasket, right? Put the two 14mm nuts
on the top mounting plate to hold the assembly in place. Make sure the
spring is orientated correctly. Another side note, since we were
putting on adjustable shocks, we made sure the adjustment knob was
pointed toward the back of the car to allow for easy access.
2.13 - Step down on the hub and put the shock and spring in place.
You did remember the white nylon gasket, right? Put the two 14mm nuts
on the top mounting plate to hold the assembly in place. Make sure the
spring is orientated correctly. Another side note, since we were
putting on adjustable shocks, we made sure the adjustment knob was
pointed toward the back of the car to allow for easy access.
2.14 - Replace the lower shock mounting bolt but don't torque yet.
2.15 - Place a jack under the hub and raise the hub until slightly lifts the car from the jack stand. Now torque the lower shock mount bolt, the upper mounting plate nuts, and the shock shaft nut. Notice that we didn't re-attach the sway bar. We replaced the sway bar with a heavier one after both rear shocks were replaced.
2.16 - Follow steps 2.2 to 2.15 for the other rear shock. It will go much faster since you know what you're doing.
Step 3 - The Rear Sway bar
3.1 - The first step would be to remove the two end-link to sway bar bolts. But that was done above to replace the shocks.3.2 - Remove the 4 bolts holding the sway bar bracket to the frame.
3.3 - Slide the bar out from behind the muffler.
3.4 - Grease the new bushings so they don't squeak.
3.5 - Slide the new bar in to position.
3.6 - Put the 4 bolts back in and torque to about 16 ft-lbs.
3.7 - Attache the end-links to the sway bars.
3.8 - With the car back on the ground, torque the end-link bolts to spec.
Step 4 - The Front Shocks
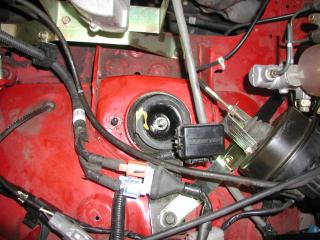 4.1 - Inside the engine compartment loosen the 14mm outer shock nuts.
Loosen the 17mm top shock nut. Don't remove any of these yet. This
car has a Racing Beat intake. This had to be removed to gain access
to the top of the shock on the drivers side.
4.1 - Inside the engine compartment loosen the 14mm outer shock nuts.
Loosen the 17mm top shock nut. Don't remove any of these yet. This
car has a Racing Beat intake. This had to be removed to gain access
to the top of the shock on the drivers side.
4.2 - Moving underneath, remove the bolt that holds the ABS wire
bracket to the shock. Also remove the upper end-link bolts that attach
the end-link to the sway bar.
 4.3 - Now would probably be a good time to mark the position of
the spring so that you can put it back in the same orientation.
4.3 - Now would probably be a good time to mark the position of
the spring so that you can put it back in the same orientation.
4.4 - Remove the 17mm bottom shock mount bolt.
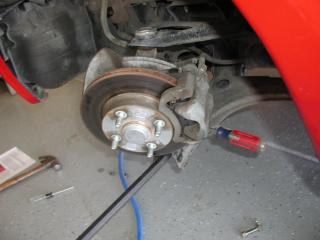
4.5 - Push down on the hub so that the A-arm drops away from the shock. Put a screwdriver through the shock mount hole in the A-arm so that when you release the hub, the screwdriver prevents the shock from dropping back in to position.
4.6 - Look at the lower A-arm. There's a 17mm bolt that goes vertically down into the A-arm. This is the bolt that holds the hub carrier tongue in place. Remove this bolt.
4.7 - Remove the other (horizontal) 17mm bolt that holds the hub carrier to the lower A-arm. You should now be able to pull the hub away from the A-arm. Remove the screwdriver.
 4.8 - Remove the two 14mm upper shock mount bolts in the engine
compartment. The shock/spring assembly should be pretty loose.
4.8 - Remove the two 14mm upper shock mount bolts in the engine
compartment. The shock/spring assembly should be pretty loose.
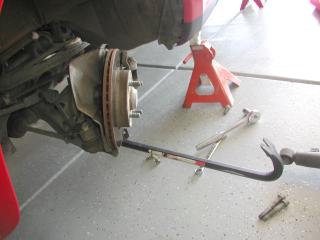
4.9 - Slide a crowbar or short breaker bar in to the lower A-arm assembly where the hub carrier tongue was.
4.10 - Now, pushing down on the lever, start wiggling the shock and spring assembly out. Be careful not to scrape the top of the shock on the fender.
 4.11 - See the white nylon gasket at the top of the shock mount? Don't
forget to put it back there before you replace the shocks.
4.11 - See the white nylon gasket at the top of the shock mount? Don't
forget to put it back there before you replace the shocks.
4.12 - Using the spring compressor, compress the spring until the tension is off the top spring seat. You can now remove the 17mm nut from the top of the shock shaft. Be very careful compressing the springs. They have have a lot of force when compressed and can cause considerable damage to property and persons if they accidentally come loose. Slide the shock out.
 4.13 - Slide the new shock inside the still compressed spring. Put the
new boot on and re-attach the top spring seat/mounting plate with the
17mm nut. Snug up the nut. We used the same method here as we did
on the front to make the boots.
4.13 - Slide the new shock inside the still compressed spring. Put the
new boot on and re-attach the top spring seat/mounting plate with the
17mm nut. Snug up the nut. We used the same method here as we did
on the front to make the boots.
4.14 - Uncompress the spring CAREFULLY. Now you're ready to put it back on the car.
4.15 - Reverse the procedure above to get the shock and spring back in place. You did remember the white nylon gasket, right? Put the two 14mm nuts on the top mounting plate to hold the assembly in place, but don't tighten them yet. Make sure the spring is orientated correctly. Another side note, since we were putting on adjustable shocks, we made sure the adjustment knob was pointed toward the front of the car to allow for easy access.
4.16 - Put the screwdriver back in the shock mount hole on the lower A-arm. You need this here to give access to the bolt that holds the hub carrier tongue in place.
 4.17 - Bolt the hub carrier back in place. Torque the 17mm vertical
bolt that holds the tongue in place. Don't torque anything else yet.
4.17 - Bolt the hub carrier back in place. Torque the 17mm vertical
bolt that holds the tongue in place. Don't torque anything else yet.
4.18 - Push down on the lower A-arm and take the screwdriver out. Now you can put the lower shock mount bolt in.
4.19 - Place a jack under the hub and raise the hub until slightly
lifts the car from the jack stand. Now torque the hub carrier bolt,
the lower shock mount bolt, the upper mounting plate nuts, and the
shock shaft nut. Notice that we didn't re-attach the sway bar. We
replaced the sway bar with a heavier one after both front shocks were
replaced.
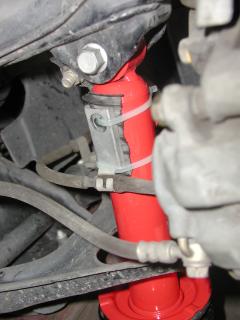 4.20 - The AGX shocks didn't have attachments for the ABS wire
bracket. We used a couple of zip ties to secure the bracket to the
shock and placed a piece of the old boot between the bracket and
the shock to help keep it in place.
4.20 - The AGX shocks didn't have attachments for the ABS wire
bracket. We used a couple of zip ties to secure the bracket to the
shock and placed a piece of the old boot between the bracket and
the shock to help keep it in place.
4.21 - Follow steps 4.1 to 4.20 for the other front shock. It will go
much faster since you know what you're doing. Doing both shocks took
us about 3 1/2 hours.
Step 5 - The Front Sway Bar
5.1 - First you have to remove the splash guard from the bottom of the car. There are quite a few 10mm bolts of various types holding this on. Once all the bolts are removed, pull the splash guard off and set it aside.5.2 - Remove the bolt that holds the ABS wire bracket to the frame. This was in the way when we tried to slide the old bar out.
5.3 - Remove the 4 bolts that hold the sway bar bracket to the frame.
5.4 - Slide the old bar out.
5.5 - Grease the new bushings so they don't squeak.
5.6 - Slide the new bar in to position.
5.7 - Put the 4 bolts back in and torque to about 16 ft-lbs.
5.8 - Re-attache the ABS wire bracket to the frame.
5.9 - Attache the end-links to the sway bars.
5.10 - Put the splash guard back on and tighten all the bolt. These don't need to be real tight so don't strip any of them.
5.11 - With the car back on the ground, torque the end-link bolts to spec.
The front sway bar took a little longer than the rear, say about 25 minutes.
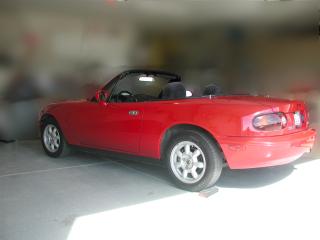
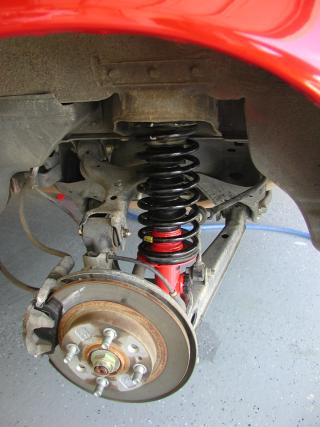
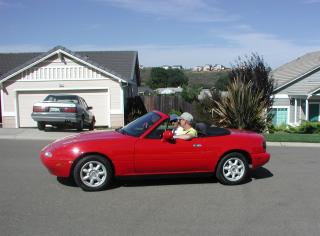 Here we are getting ready for the first test drive. We started with all
4 shocks set at 1 just to see what it was like. After the first set of
curves, we set the fronts to 2 and left the rears at 1. At this setting
the car is handling and riding much better than stock. This is probably
where it will stay most of the time.
Here we are getting ready for the first test drive. We started with all
4 shocks set at 1 just to see what it was like. After the first set of
curves, we set the fronts to 2 and left the rears at 1. At this setting
the car is handling and riding much better than stock. This is probably
where it will stay most of the time.
We did experiment with different settings. Handling does get better
with each notch we went up, until we set the fronts to 6 and the
rears to 5. The car then started skating a bit when going around
corners (we need smoother roads).
Overall, the installation went well and the stocks are a big improvement over the OEM's with nearly 60K miles.
Disclaimer: While the various articles here "appear" to be step-by-step, there may be important information not explicitly stated. Use of this material is at your own risk. You assume total responsibility and liability for your actions including but not limited to damage to any vehicle or person.